Shopify are deprecating the checkout.liquid theme file for the Information, Shipping and Payment pages on 13th August 2024 (with other areas to follow in August 2025)
Existing customisations and integrated checkout tracking on these pages will no longer function after this date. This will not impact how shopify works, but any additional third party tracking and how that data is collected will be affected. When a user rejects marketing or analytics cookies, Shopify will not fire any tracking in the checkout, whether it sets cookies or not. This has serious impacts on any required tracking or tools such as Google Ads that use cookieless pings to model key metrics back into the tool.
It’s imperative you review your setup ASAP
What is the announcement?
August 13, 2024 is the deadline to upgrade from checkout.liquid to Checkout Extensibility for the Information, Shipping, and Payment pages. Checkout.liquid is deprecated and has not been updated with new functionality since 2021. With ever changing regulations worldwide, including the introduction of card industry rules under PCI DSS v4, checkout.liquid is less secure than Checkout Extensibility, and they will discontinue its support.
Customising the Shopify checkout via checkout.liquid is typically complex and time-intensive, requiring advanced coding knowledge. Checkout.liquid customisations are often impacted by upgrades and, in some cases, result in poor checkout performance and a substandard buyer experience. They can also be problematic for security reasons.
One other additional factor to this change was in August 2022, when a conflict with Google Tag Manager in the theme code caused a 12 hour Shopify checkout global outage.
Shopify has been seeking to ensure checkout stability and performance whilst enabling the meaningful addition of new capabilities and functionality. As such, it has invested in Checkout Extensibility, a suite of apps and tools that make it easier to customise the Shopify checkout and build bespoke checkout experiences. Checkout Extensibility is secure, code-free, app-based, upgrade-safe and higher-converting. It also integrates with Shop Pay, which means, for the first time ever, express checkout can be customised.
Crucially, Checkout Extensibility replaces the need for checkout.liquid.
How will checkout extensibility impact your tracking?
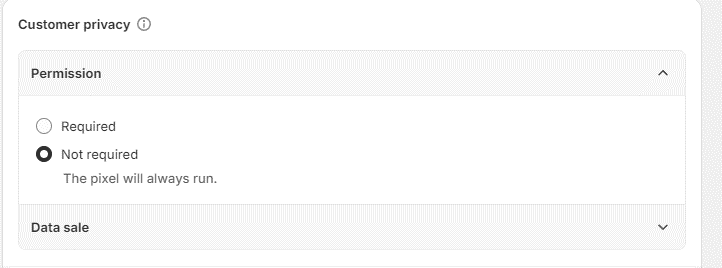
Despite Shopify positioning this as ‘no change’ to how tracking will work it severely impacts your ability to pass data into all media tracking e.g Google Ads, Meta and GA4)
The guidance and the Shopify interface says that your pixels (where tracking scripts sit in Checkout Extensibility) will always run. (see below screen grab).
However, this is incorrect as your tracking script will not run if a user rejects either marketing or analytics cookies. Blocking any tracking when a user rejects these cookies prevents technology such as cookieless pings, these are used by Google tools to model key metrics when a user opts out of cookies. This is a global issue and will continue to impact tracking for all people who’ve upgraded to checkout extensibility.
Why are shopify doing this with tracking?
It is unknown why they aren’t allowing any cookieless tracking to fire from their platform. However, Shopify is moving to Checkout Extensibility for several reasons:
Enhanced Security: The new framework is designed with better security features to protect both merchants and customers.
Scalability: Checkout Extensibility allows for a more scalable solution, accommodating growing businesses and increased traffic more effectively.
Improved Customization: The new system offers more robust and flexible customization options, enabling developers to create more sophisticated and tailored checkout experiences.
Future-Proofing: By adopting modern technology standards, Shopify aims to future-proof its platform, ensuring it remains relevant and capable of supporting new features and improvements.
What Does It Mean for You?
You will need to review the following:
Action Required: You need to migrate your checkout customizations from checkout.liquid to the new Checkout Extensibility framework before the August 13, 2024 deadline.
Learning Curve: There will be a learning curve as you familiarize yourself with the new framework and its capabilities.
Opportunities for Improvement: The new system provides opportunities to enhance and innovate your checkout process, potentially improving customer experience and conversion rates.
Support and Resources: Shopify will likely offer support and resources to assist with the transition, including documentation, tutorials, and possibly migration tools.
You’ll also need to QA your existing marketing tags to ensure everything works as expected.
What to do next?
Audit how your tags are implemented on checkout extensibility
Review turning off the privacy API and using an alternative solution to continue to use cookieless pings for Google Marketing Platform
Review using OneTrust (or similar) alongside GTM to ensure this works as expected
If you’re unsure of your current status or how to complete these steps feel free to email data@fabric-analytics.com and we can help.
How can Fabric help?
At Fabric Analytics we can provide different levels of support to ensure you’re fully ready for these new changes.
As we work on a transparent hourly based model, reach out to us and we can support with any of your needs.
If you need support reviewing your third party tracking from a custom checkout.liquid instance to Checkout Extensibility, please contact us to find out more about how our team of Experts can help you.
As one of the most experienced tracking and data agencies in the ecosystem, with a first-class team of experts and developers, we are perfectly positioned to consult on your bespoke requirements and implement these.
Developer Resources
Here are a list of Shopify web URLs that verify the details about the transition from checkout.liquid to Checkout Extensibility:
These URLs provide verification and further details about the transition, including the reasons behind it, the impacts of missing the deadline, and the benefits of the new Checkout Extensibility framework.
Google has unveiled a significant update, emphasising the need for strict compliance among website owners who use Google Marketing Products. This encompasses a range of tools such as Google Ads, GA4, Floodlights, and various other Google tags.
This change is particularly crucial for businesses that engage with users in the European Economic Area (EEA) & United Kingdom, as adherence to these new guidelines will become mandatory for effective retargeting and audience development within these regions starting 7th March 2024.
Taking action on these updates is critical; inaction will lead to a considerable reduction in data collection, efficacy of utilising Google’s marketing tools for media buying, audience targeting, and retargeting within the European Economic Area and United Kingdom.
Starting 7th March 2024, inaction will significantly disrupt conversion tracking, audience building and remarketing.
What is the announcement?
Google announced the launch of Consent Mode v2, a significant update to its web and app advertising framework. This new version is designed to ensure compliance with the latest privacy regulations and address users’ expectations regarding online privacy. Consent Mode v2 introduces enhanced features for managing user consent, particularly in relation to Google’s advertising and analytics services.
Consent mode is a mechanism introduced by Google for Tag management platforms to work alongside CMP’s (cookie management platforms) or gtags to respect a user’s privacy.
It’s a method that ensures the consent signals you gather are automatically conveyed to Google’s web and app advertising networks. As a result, Google’s tags change their behaviour to accommodate these preferences.
Google uses this data to enable conversion modelling to recover lost conversions.
This allows marketers to boost the quality of bidding algorithms and measurement capabilities.
What is new with Consent Mode v2?
Consent Mode v2 adds two additional parameters: ad_user_data and ad_personalization,
which are Google-specific and dedicated for audience building and remarketing use cases.
Without these two additional characteristics, it will be impossible to develop targeted
audiences, perform personalised advertising on Google Ads or measure performance in
the EEA and United Kingdom.
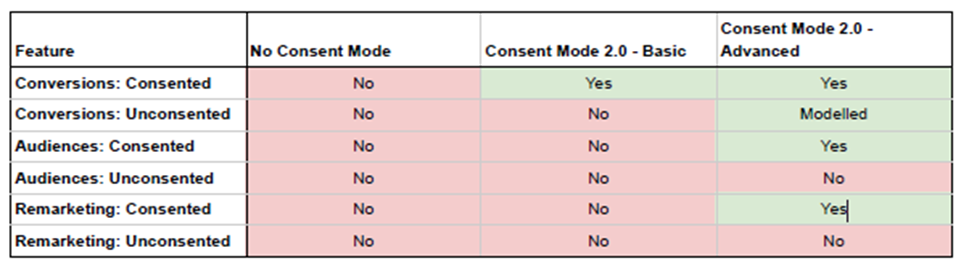
There are 2 versions of consent mode:
“Advanced Consent Mode” covers cookieless pings. Even if consent is not granted, data is sent to Google.
“Basic Consent Mode” blocks tags from firing altogether when relevant consent is not granted.
You will need to send the relevant consent signals if GA4 data is being used to feed Ads audiences through the GA4/Ads integration.
Google Consent Mode v2 is fully operational. If it is not implemented, the negative effects for advertisers will appear from 7th March 2024.
What does this mean for you?
Without Consent Mode v2, no data about new EEA users will be captured by your advertising platforms (Google Ads, GA4, etc.) after March 2024. This will affect measurement and reporting in this region, along with your audience lists and remarketing disabling the ability to run personalised advertising.
Your bidding algorithms will run based on inaccurate and incomplete data, and your budget will be spent much less effectively.
For example, if you’re running a Maximise Conversions campaign with a target CPA, it is important that conversions are measured as accurately as possible for the algorithm to function and bid effectively. When fewer conversions are registered (without Consent Mode v2), the strategy will under-evaluate some opportunities, leading to inaccurate bidding and budgets being used in less profitable ways.
Below is a visual representation of the impact of implementing different consent mode versions:
Which version of Consent Mode v2 should I implement?
Recommended: for full ads / audience / remarketing capabilities, you need to use “Advanced Consent Mode” with all four parameters in place.
If you want to block tags from firing when consent is not granted and still make something out of Ads, you need to use “Basic Consent Mode”.
You may also decline to utilise consent mode entirely, in which case Ads will be restricted – no conversion or audience features would be available. GA4 will continue to function normally; the Ads integration will be constrained.
How do I implement Consent Mode v2?
The first step is to have a consent banner on your website that respects user choices. The
For manual data uploads (not via API/SDK), a Term of Services consent attestation opt-in will be required (and will launch in the product UI in early Q1 2024).
Howdy, data enthusiasts! Today, we’re going to embark on a thrilling journey into the land of Google BigQuery, where data reigns supreme and insights flow like a chocolate fountain at Willy Wonka’s factory. Get ready to have your minds blown as we unravel the mysteries of this bewitching analytics tool and discover its glorious benefits!
What on Earth is Google BigQuery?
Imagine a vast repository of data, teeming with information from every corner of the digital universe. Now, take that colossal data warehouse, sprinkle some magic Google dust on it, and voila! You’ve got yourself Google BigQuery, the quintessential data analytics platform.
Google BigQuery is a cloud-based, serverless data warehousing and analytics solution that lets you store, analyze, and glean insights from mind-bogglingly enormous datasets. It’s like having a supercomputer at your fingertips, eagerly waiting to crunch numbers and reveal hidden patterns. It’s the ultimate geek’s paradise!
Benefits Galore – Prepare to Be Amazed!
Lightning-Fast Queries: Have you ever waited for a slow query to finish, only to fall asleep and dream about bunnies? Well, BigQuery is here to save the day! With its supercharged processing power and distributed architecture, queries run faster than a cheetah on rollerblades. Say goodbye to impatience and hello to instantaneous results!
No Infrastructure Hassles: Picture a world without worrying about servers, provisioning, or software updates. Sounds like a utopian paradise, right? BigQuery makes it a reality! It’s a serverless wonderland where you can focus solely on data analysis while Google takes care of the infrastructure behind the scenes. So sit back, relax, and let BigQuery do the heavy lifting.
Scalability with a Capital ‘S’: Need to process a gazillion rows of data? No problemo! BigQuery can effortlessly handle petabytes of information, making it ideal for businesses with insatiable appetites for data. As your needs grow, BigQuery expands magically, like a bottomless bag of popcorn at the movies.
Cost-Effective Data Storage: We all love a good bargain, and BigQuery delivers on that front too. With its storage model based on consumption, you only pay for the data you store. No need to worry about upfront costs or excess baggage. It’s like shopping for data warehousing on a 90% off sale—simply marvelous!
Seamless Integration with Other Google Services: If you’re a fan of the Google ecosystem (and who isn’t?), BigQuery is your golden ticket. It plays harmoniously with other Google services like Google Cloud Storage, Data Studio, and even AI and machine learning tools. It’s like assembling the Avengers of data analytics—all your favorite tools working together for the greater good!
So there you have it, dear readers—a whimsical tour through the enchanting land of Google BigQuery. With its blazing speed, scalability, cost efficiency, seamless integration, SQL magic, and advanced analytics capabilities, BigQuery is a formidable ally in your quest for data-driven enlightenment.
Advanced Analytics: BigQuery is not just about querying—it’s a treasure trove of analytical prowess. With its built-in machine learning capabilities, you can level up your analysis game with predictive modeling, anomaly detection, and clustering. It’s like having a crystal ball that can reveal hidden patterns and insights from your data.
So put on your analytical hats, grab your magnifying glasses, and embark on a data adventure with BigQuery. Embrace the quirks.
It’s been 100 days since we opened our doors at Fabric Analytics and, to paraphrase the old saying, “Time flies when you’re relentlessly upgrading analytics implementations for some of the highest performing teams in commerce.”
The first 100 days is a period that’s been fetishished in recent times amongst the glossy ‘airport paperback’ genre of personal and professional development, but with our first trading quarter now behind us, it seems like an appropriate moment to take stock of how it’s all going. In the absence of a boss, I’m conducting my own self-review and sharing it with you, dear readers. So, let’s dive in and explore the journey of these initial months; what have been the big hitters?
Personal attention gets better outcomes. One of the aspects I love most about running Fabric Analytics is the ability to provide personal attention to each client account. We have a team of seasoned professionals, with an average of more than 10 years of experience, who bring a wealth of knowledge and expertise. Our clients have often been underserved in the past, and we are determined to deliver a level of service that ensures they capture the full value they deserve.
It’s rewarding to do things better. Vince Lombardi, the renowned American football coach, once said, “The quality of a person’s life is in direct proportion to their commitment to excellence, regardless of their chosen field of endeavor.” This quote resonates deeply with me as I navigate the challenges of managing a fledgling business in a category where ‘good enough’ is often the benchmark. While it can be intimidating to bear the responsibility of meeting the high expectations our clients have of us at Fabric, the opportunity to really move things forwards for their business brings a tremendous sense of purpose and energy to our work. I am driven to make a lasting impact and uphold the highest standards of excellence in our industry and I’ve been heartened by the hugely positive response to our work so far.
Your support network makes you. Running a new business is not a solo endeavor! I am fortunate to have huge support from outside Fabric with family and friends. Their belief in me and what we are building have been invaluable. Building a thriving business requires a strong support system, and I am grateful to have it in abundance.
Business admin is in equal parts tedious and fascinating. From payroll and pensions to office rental and dealing with HMRC, there’s been quite a learning curve! Whilst close to two hours on the phone to HMRC one week chasing a VAT gremlin wasn’t an obvious highlight, each task adds to the breadth of knowledge required to run a successful agency. While it can be overwhelming at times, I’m embracing these challenges as opportunities for growth and improvement.
Financial accountability is more of a thrill than it sounds. As the MD, I have assumed the responsibility of the financial performance of the agency. This heightened level of accountability has certainly sharpened the mind! Whilst I’ve owned commercial performance for well over a decade, nothing makes you as deliberate in your decision making as being the one ultimately holding the purse strings and answering to stakeholders! There have been moments of nostalgia for the corporate expense account, but it pales in comparison to the thrill of building a financially sustainable business from the ground up.
Focus on the future, learn from the past. The first 100 days have provided a glimpse into the joys and challenges of running a new business. We have made significant strides, but it seems almost indulgent to be dwelling on what’s behind us already, as our optimism and determination to propel our clients forward is just spooling up! Together with my exceptional team we are embracing the future with enthusiasm and determination, but I’m going to make sure we also make time occasionally to pause and look back at what we’ve done so that we’re always learning and we make sure to enjoy the journey.
I’d like to thank our clients, our team and our partners for making this journey so special so far!
Taxonomy / Naming Conventions… not the sexiest topic but one of the most important..
Taxonomy and governance on marketing data provide structure, consistency, and reliability to your data management and analysis efforts. They enhance data integrity, enable cross-channel insights, improve collaboration, and support efficient decision-making. By implementing these practices, Lotus can leverage the full potential of their marketing data to drive growth and success.
There are many benefits to a clear taxonomy/naming conventions which include:
Consistency and Standardisation
Data Integrity and Quality
Data Integration and Cross-channel Insights
Scalability and Efficiency
Collaboration and Communication
Futureproofing and Adaptability
Taxonomy naming conventions are an essential part to global reporting and consistency. We’ve developed a clear process to apply that will allow governance and consistency.
Stage 1: Define Objectives and Scope
Define the objectives of your taxonomy and naming convention. What specific goals do you want to achieve with GA4?
Determine the scope of your taxonomy, considering the size and complexity of your business, and the number of entities you need to track.
Stage 2: Identify Key Dimensions and Metrics
Identify the key dimensions and metrics that are relevant to your business. These could include customer segments, product categories, geographic regions, channels, campaigns, or any other data points you want to track.
Prioritise the dimensions and metrics based on their importance and relevance to your business goals.
Stage 3: Establish Naming Conventions
Develop a standardised naming convention for each dimension and metric. Ensure that the conventions are consistent, clear, and easily understood by all stakeholders.
Consider including prefixes or codes to categorise different types of dimensions or metrics, which can help with organising and filtering data.
Stage 4: Document and Communicate the Taxonomy
Document the finalised taxonomy and naming convention in a comprehensive guide or document. Include definitions, examples, and guidelines to ensure consistent implementation across the organization.
Communicate the taxonomy to all relevant stakeholders, including analysts, marketers, and developers. Conduct training sessions if necessary to ensure everyone understands the conventions and their importance.
Stage 5: Implement and Validate
Implement the taxonomy and naming convention in GA4, making sure to follow the established guidelines and conventions.
Validate the implementation by monitoring and reviewing the data collected. Ensure that the data is organized and structured correctly and aligns with your predefined objectives and metrics.
Continuously review and refine the taxonomy as your business evolves, ensuring it remains relevant and effective.
Developing a taxonomy and naming convention is an iterative process, and it may require adjustments based on feedback and changing business needs. Regularly revisit and update your taxonomy to keep it aligned with your evolving business requirements.
Are you unhappy with your GA4 configuration?! I imagine part of this is because you’ve got a ‘standard’ implementation vs a custom one.
Implementing a custom implementation is critical to get the most from the technology and that starts with a measurement workshop and creation of a measurement plan..
To help you out we’ve detailed our process below..
The sole aim of the measurement workshop is to agree exactly what your KPIs are and agree jointly about what needs to be tracked across the website.
Our measurement discovery workshop is a collaborative session aimed at identifying key business goals, defining relevant metrics, and establishing a measurement framework.
Our 4-step process ensures we get to an output that’s a shared document across Fabric and the client that will act as a blueprint for what needs to be tracked.
Step 1: Establish Business Goals and Objectives
Discuss and document the primary business goals and objectives. This could include increasing website conversions, improving customer retention, driving revenue growth, or any other relevant goals.
Prioritise and finalise the key goals and objectives that will be the focus of the measurement framework.
Step 2: Define Key Performance Indicators (KPIs)
Once the goals and objectives are established, facilitate a discussion to identify the most relevant and meaningful Key Performance Indicators (KPIs) for each goal.
Evaluate each proposed KPI based on its alignment with the goals, measurability, and ability to provide actionable insights.
Select a set of KPIs that best represent the progress and performance of the defined business goals.
Step 3: Determine Data Sources and Measurement Methods
Define the measurement methods and tracking mechanisms needed to collect the necessary data for each KPI.
Document the agreed-upon data sources, measurement methods, and tracking requirements.
Step 4: Develop a Measurement Plan
Summarise the outcomes of the workshop by developing a comprehensive measurement plan. Document the business goals, associated KPIs, data sources, measurement methods, and tracking requirements for each KPI.
Define the reporting and analysis framework, including the frequency, format, and distribution of reports to stakeholders.
Assign responsibilities and establish a timeline for the implementation of the measurement plan.
Share the measurement plan with workshop participants and relevant stakeholders for feedback and alignment.
Here at Fabric Analytics we see some really simple things that can make an immediate improvement to data collection and quality. Most of those revolve around governance! We’ve written a quick top tips article which focuses on process to getting the most robust data.
First why is GTM and Governance important?
Centralized Control: GTM provides a centralized platform to manage all tags and tracking codes on a website, allowing for streamlined control and coordination.
Reduced Dependence on Developers: Non-technical users can easily implement and update tags through GTM’s user-friendly interface, reducing the reliance on developers for basic tracking needs.
Version Control and Rollbacks: GTM allows for versioning of containers, enabling marketers to test and deploy changes without affecting the live site. This ensures a safety net for quick rollbacks if needed.
Enhanced Data Security and Privacy:Establishes protocols for safeguarding sensitive information, reducing the likelihood of data breaches and unauthorized access.
Data Quality Assurance:Ensures that data is accurate, reliable, and consistent, leading to higher confidence in decision-making and analysis
How should governance by applied to tag management?
Step 1: Tag Creation and Configuration
Define Tag Requirements: Start by understanding the tagging requirements for your website or application. Identify the tags you need to implement, such as tracking tags, conversion tags, or third-party scripts.
Create Tags in GTM: Log in to your GTM account and create new tags based on the requirements. Configure the tag settings, such as triggering rules, variables, and tag-specific parameters.
Test Tag Functionality: Before deploying the tag, test its functionality within the GTM preview mode. Validate that the tag fires correctly and captures the desired data. Use the debug console and browser developer tools to inspect network requests and ensure the tag is functioning as intended.
Ensure only the right people in your organisation can publish tags
Step 2: Deployment in GTM Container
Publish Container: Once you have verified the tag functionality, publish the GTM container that contains the newly created tags. This will make the tags available for deployment on your website or application.
Implement GTM Container on Website: Follow the instructions provided by GTM to implement the container code on your website or application. This involves placing the GTM container snippet in the header of your websites
Test Tag Deployment: After deploying the GTM container, perform a test run to ensure that the tags are firing correctly on your live website. Use browser extensions, such as the GTM Debug Mode or Google Tag Assistant, to validate tag firing and data collection.
Step 3: Quality Assurance (QA) Testing
Create Test Scenarios: Define test scenarios that cover different user interactions and events on your website or application. This could include form submissions, button clicks, page views, and other relevant actions.
Execute Test Scenarios: Go through each test scenario, interact with the website or application as a user would, and verify that the tags fire and capture the expected data accurately. Use browser developer tools and GTM’s debug mode to review tag firing in real-time.
Data Validation: Review the data captured by the tags in your analytics or tag management platform. Compare the captured data against the expected results to ensure accuracy and completeness.
Error Handling: During the QA testing, identify and address any errors or issues encountered. Debug and troubleshoot problematic tags or triggers to ensure smooth and accurate data collection.
Step 4: Documentation and Sign-off
Document QA Results: Create a comprehensive report that outlines the test scenarios, test results, and any issues encountered during the QA process. Document the steps taken to resolve any problems.
Share Results and Obtain Sign-off: Share the QA report with relevant stakeholders, such as marketing, analytics, or development teams. Obtain their sign-off to confirm that the tags are accurately implemented and functioning as expected.
Ongoing Monitoring and Maintenance: Regularly monitor the tags and their data collection to ensure ongoing accuracy. Perform periodic checks and updates as your website or application evolves. Following this process, you’ll be able to create, deploy, and complete QA for tags on Google Tag Manager, ensuring accurate and reliable data collection for your analytics and tracking needs. *#Following this process, you’ll be able to create, deploy, and complete QA for tags on Google Tag Manager, ensuring accurate and reliable data collection for your analytics and tracking needs
Following this process, you’ll be able to create, deploy, and complete QA for tags on Google Tag Manager, ensuring accurate and reliable data collection for your analytics and tracking needs.
On 1st July Google Analytics 4 will be the web analytics choice of many businesses with GA3 being deprecated. Since 2015 everyone has got used to ‘staple’ metrics to understand performance. These are sessions, users, bounce rate and last click attribution.
Just when everyone felt comfortable GA4 has now changed all of these metrics…
We’ve tried to give a simple explanation of each of the changes to try and make your life a lot easier
Sessions are changing
Normally you’d see sessions higher in GA3 vs GA4
⭐ There will be ‘overinflated’ traffic sources in GA3 vs GA4. In GA3 it pins the traffic source to however the session started. So… if a session starts from a click on a PPC ad and then in that same session renters the site using a voucher code website GA3 = 2 sessions, GA 4 = 1 session.
⭐ But.. the traffic source in GA 4 will be allocated to the PPC ad as this will be pinned to the ‘session start’ traffic source.
⭐ Also the funky ‘restart a session if it crosses over midnight is now gone (that’ll be small volume most likely!)
Users are changing to active users
Normally you’d see ‘users’ higher in GA3 vs GA4
⭐ Active users is basically users that don’t leave you site after an interaction (I think it’s easier to see these as non-bouncing users really..).
⭐ Google is now applying ‘engaged sessions’ to users to generate active users. Engaged sessions means they’ve triggered an event on your website (ie scrolled etc, etc)
⭐ These will naturally record lower as the active user is only counted if they trigger an event vs being counted by default in GA3.
⭐ Also.. If user ID functionality is enabled this will also count multiple ‘users’ as one and dedupe in your interface reports.
Bounce rate doesn’t exist – it’s engagement rate
⭐ Essentially ‘current’ bounce rate in GA3 is percentage of sessions that leave your site without doing anything else. So, bounce rate = single-page sessions / total sessions.
⭐ Whereas GA4 essential flips the metric on its head with ‘engaged sessions’
⭐ An engaged session is triggered by the visit lasting 10 seconds or longer (this can be changed to 60 seconds if needed), triggering a conversion event (assuming these are set up) or consuming 2 or more pages.
⭐ So, engagement rate = engaged sessions / total sessions. In short engagement rate is the inverse of bounce rate (IE % of those who interact vs those who leave)
⭐ So using this simple example should make it clearer.. 10 users visit your site. 5 of them leave without clicking on anything^ and 5 of them click onto another page. GA 3 bounce rate = 50%, GA 4 engagement rate = 100%
^if they spend more than 10 seconds on the site
Attribution
⭐ GA4 is Data Driven attribution by default and not last click
⭐ DDA is an algorithmic model that takes into account each of the touchpoints observed for your website conversion events. It then does some modelling to assign credit to each channel.
⭐ GA4 collects up to 50+ touchpoints, ensuring that all of your marketing efforts are taken into account when assigning credit.
⭐ So in your reports you’re likely to see conversions like 1,456.67 transactions for paid search as it takes all the data and credits it to the channels that drove conversion.
⭐ This is likely to make nutoriusly focused last click channels like affialites decline in credit and upper funnel like display get more credit
So in summary…
⭐Sessions should go down
⭐users should go down ⭐it’s a new metric to understand page and traffic performance (engagement rate)\
Do you have a data dictionary internally? We find it’s a super useful document for governance, data consistency and continuity.
With all the confusing metrics in GA4, internal acronyms and data silos we highly recommended creating one! Here at Fabric we can appreciate this isn’t the ‘coolest’ piece of work, but it’ll save so much time in the long term!
Don’t have one? We’ve put together a bespoke 6 point process to follow!
We have a bespoke 6 stage process when creating a data dictionary for any business.
Stage 1: Define the Purpose and Scope
Clearly articulate the purpose and scope of the data dictionary. Determine the specific objectives and requirements that the data dictionary should fulfil. This includes identifying the intended audience, the types of data to be documented, and the level of detail required.
Stage 2: Identify Key Stakeholders
Identify the key stakeholders who will be involved in the creation and maintenance of the data dictionary. These stakeholders may include data analysts, database administrators, data owners, and subject matter experts. Engage with them to understand their needs and perspectives to ensure the data dictionary meets their requirements.
Stage 3: Inventory Data Elements
Conduct a thorough inventory of the data elements within the organisation or the specific project. Identify all relevant data sources, databases, tables, columns, and any other components that store or manipulate data. It is crucial to document the data elements accurately, including their names, descriptions, data types, and any constraints or relationships with other elements.
Stage 4: Define Data Attributes and Relationships
For each data element identified in the previous stage, define its attributes and relationships. Attributes may include things like data length, format, allowed values, and any other relevant characteristics. Identify relationships between data elements, such as primary keys, foreign keys, and dependencies, to capture the interconnectivity of the data.
Stage 5: Document Metadata and Business Rules
Enhance the data dictionary by documenting metadata and business rules associated with each data element. Metadata includes information such as the source of the data, data quality requirements, and data usage guidelines. Business rules define the validation and transformation rules that govern data elements. Documenting these aspects ensures a comprehensive understanding of the data and promotes consistency and accuracy in data management.
Stage 6: Establish Maintenance Procedures
Develop procedures for maintaining the data dictionary over time. Assign responsibilities to individuals or teams for updating and reviewing the dictionary regularly. Establish guidelines for incorporating changes, additions, and retirements of data elements. Ensure that the data dictionary remains up to date and relevant by incorporating it as part of the organization’s data governance framework. Remember, this bespoke process can be tailored to the specific needs and requirements of your organisation or project.
Here are Fabric Analytics we can appreciate the complexity, fear and panic that comes with a GA4 implementation.. With the ‘sunset’ date looming over closer we’ve put together a top 20 tips to configuring your GA4 account.
These are supposed to be a bite sized approach configuring your data to make it compliant, robust and enable all the advanced functionality.
Fabric Analytics tip #1 – change your date retention settings*
Do you only want 2 months of data stored in your GA4 property… I didn’t think so..
What does this means for you?
If you leave the ‘2 month’ box ticked you’ll only be able to see data for the past 2 months within the ‘explore’ section of your property. Whilst you can look beyond this period in your other areas (reports and advertising) it limits the analysis that can be conducted to understand onsite behaviour, debug and optimise media across the GMP.
In GA4 the data retention setting only affects Exploration reports, it does not impact standard aggregate reports (including primary and secondary dimensions) This is because the aggregate reports don’t rely on raw data tables to stitch and filter dimensions, metrics and IDs on the fly which is a requirement within the Exploration reports (particularly where segmentation is used).
How do I fix it?
Click admin, data settings, data retention and then change it 😊.
Notes.
The retention period on 360 accounts have the following additional options: 26, 38 and 50 months. A two-month retention period is always applied to age, gender, and interest data regardless of the settings. You’ll need to have the right privacy policy in place and check with your DPO/legal team is this is what your company wants to do re data retention.
Fabric Analytics tip #2 – enable Google signals data collection
Do you want really useful demographic information about your users in your GA4 account such as age, gender and interests?
What does this mean for you?
If Google signals is active, analytics will associate the visitation information that it collects from a site and/or apps with Google information from accounts of signed-in users who have consented to this association for the purpose of ads personalisation.
This Google information may include end user location, search history, YouTube history and data from sites that partner with Google – and is used to provide aggregated and anonymised insights into your users’ cross-device behaviours. As such, activating Google signals gives businesses more holistic demographic and interest data.
How do I fix it?
Click admin, data settings, data collection, data retention and get started it 😊.
Notes
*You’ll need to have the right privacy policy in place and check with your DPO/legal team is this is what your company wants to do re data retention.
Fabric Analytics tip #3 – Create a test property
You don’t want your nice lovely configured data to be ruined in GA4 do you?
What does this mean for you?
GA4 doesn’t give you the same flexibility when it comes to test views. As it stands there is no way to test new configuration and tracking deployment without impacting your total raw data set. Creating a separate GA4 property gives you the ability to test data and interface configuration before it goes into your main account
How do I fix it?
Click admin, create property and then deploy via GTM 😊
Fabric Analytics tip #4 – Link your Google ads/SA360 account
Want Google Analytics 4 conversions in Google Ads to optimise your campaigns, decrease CPAs and use audiences to personalise media?
What does this mean for you?
Once you link Google Ads in the GA4 interface you’ll see metrics such as impressions, clicks, and costs paid ads data in Google Analytics 4 directly.
Once connected GA4 4 will also show additional acquisition dimensions in User and Traffic acquisition reports meaner greater analysis capabilities.
The Search Ads 360 (SA360) integration with GA provides the following benefits: Export GA audiences to SA360; export conversions based on the cross-channel last click attribution model from GA to SA360; import SA360 campaign and cost data to GA; GA app- and site-engagement metrics are available in SA360 reports (if upgraded to the new SA360 experience).
How do I fix it?
Click Admin, Google ads/search ads 360 > Link
Note you’ll need edit access for the GA4 property and admin rights on the Google Ads/Search Ads 360 accounts
Fabric Analytics tip #5 – ignore payment gateways
You don’t want paypal, Klarna or other gateways as traffic sources that are attributed conversions!
What does this mean for you?
Third party payment sites (or similar, e.g. 3D secure vendors) that aren’t included within the ‘Configure your domains’ setting won’t be subject to automatic self-referral detection and analytics may display the domain names of such sites as the referral-traffic sources in reports, impacting attribution.
Adding a domain to the unwanted referrals list ensures that analytics will automatically add the ignore_referrer=true parameter and value to any events where the referrer value includes a domain that is present on the list. That parameter indicates to analytics that the referrer should not be displayed as a traffic source.
How do I fix it?
Click Admin, data streams, configure tag settings, list unwanted referrals
Fabric Analytics tip #6 – remove internal, partner and bot traffic
You don’t want internal, partner and bot traffic distorting your nice lovely data?
What does this mean for you?
Internal traffic patterns (those created by users testing/checking a site or app) are typically different from external (public) traffic patterns. Consequently, it is best practice to identify such traffic so that it can be excluded from analyses and prevent it from influencing insights.
The process for doing this in GA4 involves 2 steps: identifying internal traffic & excluding that traffic.
Data Filters complete the second step and allow data to be filtered based on specific traffic_type parameter values (set by the Internal traffic rules) and there is currently a limit of 10 filters per property. GA4 offers the option to apply a destructive filter (which excludes data by filtering prior to it reaching the reports) or to apply a “test” filter which effectively tags the events with an identifying parameter which can then be used to filter those events manually from reports (this approach is non-destructive).
Due to their non-destructive nature, using the “Testing” state is recommended in most cases but there is an option to remove completely depending on your requirements
How do I fix it?
Click Admin, data streams, configure tag settings, define internal traffic. don’t forget to escape your dots if you’re using a regex (this is a very common mistake we see!)
Fabric Analytics tip #7 – enable BigQuery
You want access to your raw unaggregated hit level data to analyse and predict your customer behaviour right?
What does this mean for you?
Firstly, enabling this link will give you access to all data from GA4 and not have it limited to 14 months as per the data retention period in the interface.
The GA/BigQuery integration pipes event-level data into BigQuery which is a Google Cloud Platform (GCP) tool that enables complex queries to be run at high-speed across large datasets using a SQL-like syntax. This facilitates advanced modelling of customer journeys, audiences and more.
You can easily set up data pipelines, stream data in real-time, and transform data on the fly. BigQuery also has a nifty feature called BigQuery ML, which lets you build and deploy machine learning models directly within BigQuery. You can train models, make predictions, and uncover hidden patterns all within the BigQuery.
This handily can then be used to optimise media and customise creative all within the GMP.
How do I fix it?
Click Admin, BigQuery Links, link, choose a BigQuery Project
Fabric Analytics tip #8 – link Search Console
Want to know detailed information about your natural search traffic to optimize it?
What does this mean for you?
The Search Console integration adds two additional reports to the linked property (Google Organic Search Queries and Google Organic Search Traffic) which lets businesses analyse organic search related to their site.
This includes where the site is ranked in search results, which queries lead to clicks, and how those clicks translate to user behaviour/conversions. Linking is performed at the web data stream level and a Search Console property may only be linked to a single data stream.
Similarly, only one data stream per property can be linked to a Search Console property meaning that only the primary domain for that property should be linked.
Fabric Analytics tip #9 – create a custom channel grouping
Want to understand and label your traffic by what’s most relevant for your business?
What does this mean for you?
The default channel groups categories your traffic into predefined rules that often won’t fit with your naming conventions or how you want to categorise your traffic. Custom channel grouping allows you to group your marketing channels based on your specific needs and requirements. Unlike the previous version of Google Analytics (Universal Analytics), GA4 uses a new data model that focuses on events and user properties instead of sessions and hits.
It’s really important these are created as you apply it to attribution, model comparison and all other relevant reports to understand how your channels are performing.
Custom channel groupings offer more flexibility, deeper insight, enhanced attribution and improved reporting
How do I fix it?
Click Admin, data settings, channel groups, create new channel group
Fabric Analytics tip #10 – ensure conversions are being tracked
Want to understand how your website if performing against your key KPIs?
What does this mean for you?
Goals are a powerful feature in Google Analytics 4 (GA4) that allow you to track and measure specific actions or behaviours that you consider valuable on your website or app. Defining conversions is a fundamental component of any digital analytics measurement plan.
Having properly configured conversions allows Analytics to provide critical information, such as the number of conversions and the conversion rate for the site or app. Without this information, it’s almost impossible to evaluate the effectiveness of online business and marketing campaigns.
Analytics automatically designates purchase, first_open, in_app_purchase, app_store_subscription_convert and app_store_subscription_renew events as conversions but an additional 30 events (50 in 360) can be configured as conversions within a property.
It’s important to mark what’s relevant to your business as conversions as this will power understanding marketing activity but also it’ll be used against your bidding strategies within Google Ads, SA360 and DV360.
How do I fix it?
Click Admin, events, mark as conversion
Fabric Analytics tip #11 – check your attribution settings? Are they data driven?
Want to use machine learning to correctly assigned credit to your marketing channels?
What does this mean for you?
This is a big change between GA3 and GA4. GA3 is last click by default and GA4 is data-driven attribution by default!
Data-Driven Attribution uses data from the Analytics account to generate a custom model for assigning conversion credit to marketing touchpoints throughout the entire customer journey. The custom Data-Driven model provides a more complete and actionable view of which digital channels and keywords are performing best, so better decisions can be made about where to invest marketing resources.
Don’t forget Google are deprecating all of the position based models (IE Linear, first click etc) from September 2023 – https://support.google.com/google-ads/answer/13427716?hl=en
How do I fix it?
Click Admin, attribution settings, Reporting attribution model
Fabric Analytics tip #12 – do you have audiences set up to use across the GMP?
Want to use your first party data across your media buying?
What does this mean for you?
Audiences let you segment users in ways that are important to the business. Segmenting by dimensions, metrics, and events enables practically any subset of users to be created.
They’re a fantastic way to optimize media spend, decrease CPA, personalise creative and find new valuable customers.
As Analytics continually re-evaluates audience memberships, users are dynamically removed where they no longer meet the audience criteria. Audiences can be used in a number of ways: If Personalized Advertising is enabled, they can be shared with other GMP products for use in ad campaigns; they can be used within filters and comparisons in the core reporting; and clicking on them from within the Configure > Audiences view provides a high-level overview of engagement for that audience.
How do I fix it?
Click Admin, audiences, new audience
Fabric Analytics #13 – have you updated your library collections in your property?
Want to tailor your reports to show you the information that is most relevant to you?
What does this mean for you?
GA4 has limited interface reporting vs GA3. There are things missing from the ‘standard’ reports such as site search. Changing the interface can give you the information you need and make everyone in the business access the same information.
A collection is a set of reports within analytics. Users with the Editor role can create custom collections and tailor them to create bespoke report navigation experiences that make analytics easier to work with for their colleagues.
These can be any report and get them added into the library (assuming it’s all set up correctly in the first place!).
Small tip! I’d think EXACTLY what reports you require as it can be overwhelming with the options that are presented!
How do I fix it?
Click reports, library
Fabric Analytics tip #14 – Have you built funnels to understand your key journeys?
Of course you want to understand the drop offs on your sign ups, checkout and other key journeys!
What does this mean for you?
By default GA4 doesn’t include a ‘funnel’ report within the standard set of reports. To understand the drop offs against each step of a key journey you’ll need to create a funnel* in the explore section
Whilst defining conversions is a fundamental component of any digital analytics measurement plan and enables the effectiveness of online business and marketing campaigns to be evaluated, understanding the on-site/in-app path to conversion is equally important.
Funnel explorations enable businesses to visualize the steps their users take to complete a task and quickly see how well they are succeeding or failing at each step. This information is critical for informing optimization activities to improve inefficient or abandoned customer journeys.
*Tip 1 – for the best ecommerce funnel reports you’ll need to implement a robust GA4 dataLayer and pass through the steps/key actions as additional events.
Tip 2 – You can create these and share the funnel explorations meaning they can be viewed (not edited), by anyone who has Viewer permissions within a property which drives collaboration and reduces wasted/duplicated effort.
How do I fix it? Click Explore, Funnel
Fabric Analytics tip #15 – Have you implemented a ‘proper’ dataLayer?
Do you want to collect ALL valuable ecommerce information such as product page impressions, sizes, colours, prices, sales item Y/N, item brand, discounts and much, much more… Of course you do!!!!
What does this mean for you?
Implementing one of these is ESSENTIAL to success for any ecommerce business; a dataLayer allows you to surface all the AMAZING information that’s available on your PLP, PDP and checkout areas.
This is one of the most common mistakes we see on our ecommerce clients. Our clients are often told ecommerce is ‘set up’ and then when we review we’re shocked with how little information is available in the GA4 account*. There’s often just a ecommerce conversion added in but NO robust and comprehensive dataLayer.
Benefits of a dataLayer are simple
• Makes custom tracking MUCH easier
• Surface readily accessible variable values for reporting and marketing\
• Stops the need to scrape the page and lead to constant breaking of data collection!\
• Create reliable consistent naming conventions which can be used by multiple tools and tech \
• Simpler debugging
*note to dev agencies – setting up a basic ecommerce tag does not constitute a dataLayer or a valid GA4 ecommerce set up.
How do I fix it? Here is a link to Google’s standard dataLayer – https://developers.google.com/tag-platform/tag-manager/web/datalayer. It’s not exhaustive by any means but it gives a lot of information over an above ‘transactions’.
Fabric Analytics tip #16 – Is your reporting currency set right in your property?
Do you want to understand your ecommerce performance with the most relevant currency? Of course, you do!
What does this mean for you?
You need to set your reporting currency to how you want your website ecommerce revenue to be reported at a property level. So many businesses accidently leave this at the default (which is USD).
Businesses that transact in more than one currency can specify a local currency type when sending transaction data to analytics. Analytics will perform the necessary conversion using the prior day’s exchange rate.
What do you do if you’ve got multiple different payment currencies? You can pass through currency as a custom dimension. All very powerful stuff if you can get it into GA4 and then BigQuery!
How do I fix it? Admin, property settings, currency displayed as
Fabric Analytics tip #17 – have you got advanced tracking in your custom events?
You want to understand key interactions on your site don’t you?
What does this mean for you?
An event allows you to measure a specific interaction or occurrence on your website or app. You can can use an event to measure newsletter sign ups, logins, content consumed and more ‘standard’ things like add to basket and purchase.
Event creation is a useful tool for creating new events based on a subset of existing events without the need to make tagging changes. Due to the current restrictions within GA4 for identifying conversions, event creation can be used to fire additional event types for interactions such as views of specific pages (e.g. sign-up complete) or certain file downloads (e.g. application.pdf) which can then be used as dedicated conversion events for reporting and can have values attributed to them.
How do I fix it?
Admin, event settings, create event – note you’ll also need to deploy this in GTM.
Fabric Analytics tip #18 – have you got your reporting identity set up correctly?
Is your reporting identity appropriate to ensure all GA4 advanced features are enabled?
What does this mean for you?
Assuming consent mode is active* with cookieless pings, the Blended setting should be active for reporting identity to ensure analysts are able to benefit from modelled data.
Blended data uses a combination of User ID, Google Signals, Device ID, and Modelled data if nothing else is available to power information into your GA4 account
When you collect data with analytics storage set to ‘denied’ via the Consent Mode API, these data points – collected through ‘unconsented pings’ – are filtered out of your reports and are not available in any exports, such as those to Google BigQuery.
Instead, these platforms use the unconsented data points to build models that predict or show what true conversion and event volumes would have been if all users had consented to cookies or client-side data storage.
Consent mode lets you communicate your users’ cookie or app identifier consent status to Google. Tags adjust their behavior and respect users’ choices. Consent mode interacts with your Consent Management Platform (CMP) such as OneTrust or Cookiebot .
How do I fix it?
Admin, reporting identity, blended
Fabric Analytics tip #19 – have you got a USER ID collection function enabled?
Do you want to understand your customers across multiple devices to understand them better?
What does this mean for you? The User-ID parameter (must be non-PII) can associate multiple sessions (and any activity within those sessions) with a unique ID, across different devices and clients (browsers). When you send a unique ID and any related engagement data to Analytics, all activity is attributed to one user in the reports. Because every unique user ID is considered to be a unique user in Analytics reports, you get more accurate user data that better reflects the real world.
If someone is browsing your website anonymously (IE not logged in), that variable will return undefined. Once the user logs in to their account on your website, the ID should become available, and then the next time this GA4 config tag fires, it should also contain the user_id to tie up the sessions.
Note – The user ID must only be populated when the user is logged in in order to comply with Google Analytics User ID Terms. So this could be surfaced when they create an account.
How do I fix it? You’ll have to have a dataLayer implemented (post 15 in our tips) that surfaces USER_ID. But in your base GA4 tag in GTM if you click on Fields to Set > Add Row and enter user_id that should pull through nicely 😊.
Fabric Analytics tip #20 – Account Access Management
Do the right people have access to your account?
What does this mean for you? User levels should be kept to the lowest level they need to prevent unauthorised users from editing the settings and damaging the data by mistake. Having more than one admin on the account provides redundancy if one of the admins is unavailable.
You’ll also need to review who has access to the data set, Often old partners to GTM and GA have publish access which without the required governance can break tags and lead to wasted investment.
How do I fix it? Admin, account access management – then remove away!